- MS Excel Basics
- Excel - Home
- Excel - Getting Started
- Excel - Explore Window
- Excel - Backstage
- Excel - Entering Values
- Excel - Move Around
- Excel - Save Workbook
- Excel - Create Worksheet
- Excel - Copy Worksheet
- Excel - Hiding Worksheet
- Excel - Delete Worksheet
- Excel - Close Workbook
- Excel - Open Workbook
- Excel - Context Help
- Editing Worksheet
- Excel - Insert Data
- Excel - Select Data
- Excel - Delete Data
- Excel - Move Data
- Excel - Rows & Columns
- Excel - Copy & Paste
- Excel - Find & Replace
- Excel - Spell Check
- Excel - Zoom In-Out
- Excel - Special Symbols
- Excel - Insert Comments
- Excel - Add Text Box
- Excel - Undo Changes
- Formatting Cells
- Excel - Setting Cell Type
- Excel - Setting Fonts
- Excel - Text Decoration
- Excel - Rotate Cells
- Excel - Setting Colors
- Excel - Text Alignments
- Excel - Merge & Wrap
- Excel - Borders and Shades
- Excel - Apply Formatting
- Formatting Worksheets
- Excel - Sheet Options
- Excel - Adjust Margins
- Excel - Page Orientation
- Excel - Header and Footer
- Excel - Insert Page Breaks
- Excel - Set Background
- Excel - Freeze Panes
- Excel - Conditional Format
- Working with Formula
- Excel - Creating Formulas
- Excel - Copying Formulas
- Excel - Formula Reference
- Excel - Using Functions
- Excel - Builtin Functions
- Advanced Operations
- Excel - Data Filtering
- Excel - Data Sorting
- Excel - Using Ranges
- Excel - Data Validation
- Excel - Using Styles
- Excel - Using Themes
- Excel - Using Templates
- Excel - Using Macros
- Excel - Adding Graphics
- Excel - Cross Referencing
- Excel - Printing Worksheets
- Excel - Email Workbooks
- Excel- Translate Worksheet
- Excel - Workbook Security
- Excel - Data Tables
- Excel - Pivot Tables
- Excel - Simple Charts
- Excel - Pivot Charts
- Excel - Keyboard Shortcuts
- MS Excel Resources
- Excel - Quick Guide
- Excel - Useful Resources
- Excel - Discussion
- Selected Reading
- UPSC IAS Exams Notes
- Developer's Best Practices
- Questions and Answers
- Effective Resume Writing
- HR Interview Questions
- Computer Glossary
- Who is Who
Workbook Security in Excel 2010
Workbook Security
We can apply security to the workbook by the concept of protection available in the Review Tab of ribbon. MS Excel's protection-related features fall into three categories.
Worksheet protection − Protecting a worksheet from being modified, or restricting the modifications to certain users.
Workbook protection − Protecting a workbook from having sheets inserted or deleted, and also requiring the use of password to open the workbook.
Protect Worksheet
You may want to protect a worksheet for a variety of reasons. One reason is to prevent yourself or others from accidentally deleting the formulas or other critical data. A common scenario is to protect a worksheet, so that the data can be changed, but the formulas can’t be changed.
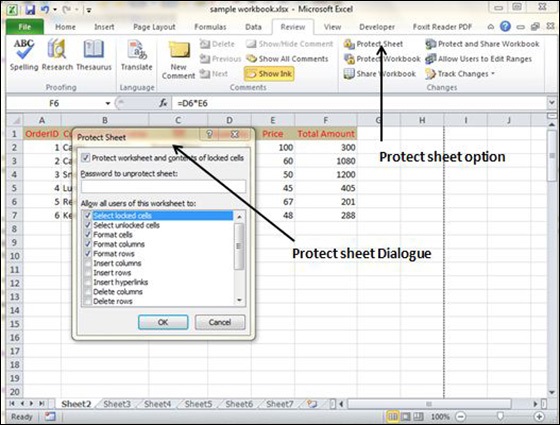
To protect a worksheet, choose Review » Changes group » Protect Sheet. Excel displays the Protect Sheet dialog box. Note that providing a password is optional. If you enter a password, that password will be required to unprotect the worksheet. You can select various options in which the sheet should be protected. Suppose we checked Format Cells option then Excel will not allow to format cells.

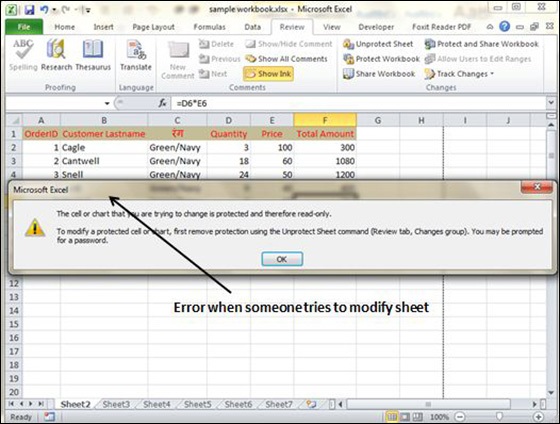
When somebody tries to format the cells, he or she will get the error as shown in the screenshot below.

To unprotect a protected sheet, choose Review » Changes group » Unprotect Sheet. If the sheet was protected with a password, you’re prompted to enter that password.
Protecting a Workbook
Excel provides three ways to protect a workbook.
Requires a password to open the workbook.
Prevents the users from adding sheets, deleting sheets, hiding sheets, and unhiding sheets.
Prevents users from changing the size or position of windows.
Requiring a Password to Open a Workbook
Excel lets you save a workbook with a password. After doing so, whoever tries to open the workbook, must enter the password. To add a password to a workbook, follow these steps.
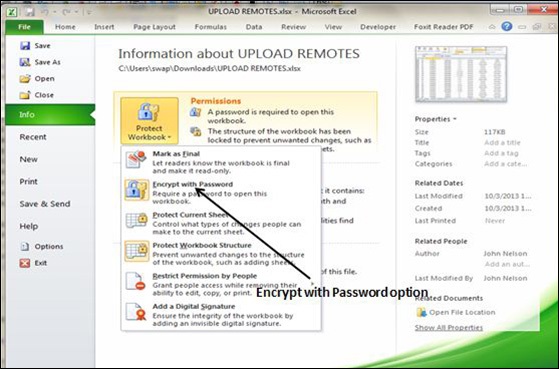
Choose File » Info » Protect Workbook » Encrypt With Password. Excel displays the Encrypt Document dialog box.
Type a password and click OK.
Type the password again and click OK.
Save the workbook.

To remove a password from a workbook, repeat the same procedure. In Step 2, however, delete the existing password symbols.
Protecting Workbook’s Structure and Windows
To prevent others (or yourself) from performing certain actions in a workbook, you can protect the workbook’s structure and windows. When a workbook’s structure and windows are protected, the user may not Add a sheet, Delete a sheet, Hide a sheet, unhide a sheet, etc., and may not be allowed to change the size or position of a workbook’s windows respectively.
To protect a worksheet’s structure and windows, follow the below mentioned steps.
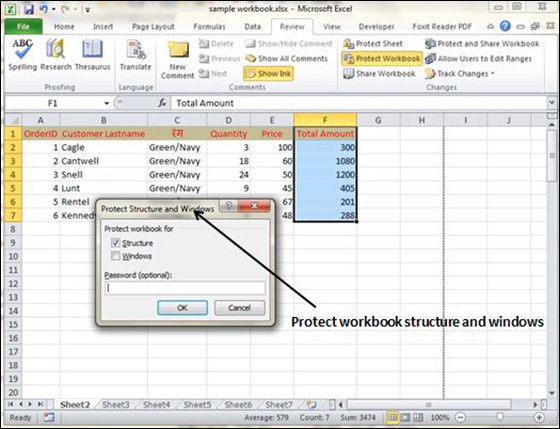
Choose Review » Changes group » Protect Workbook to display the Protect Workbook dialog box.
In the Protect Workbook dialog box, select the Structure check box and Windows check box.
(Optional) Enter a password.
Click OK.

