- PyTorch Tutorial
- PyTorch - Home
- PyTorch - Introduction
- PyTorch - Installation
- Mathematical Building Blocks of Neural Networks
- PyTorch - Neural Network Basics
- Universal Workflow of Machine Learning
- Machine Learning vs. Deep Learning
- Implementing First Neural Network
- Neural Networks to Functional Blocks
- PyTorch - Terminologies
- PyTorch - Loading Data
- PyTorch - Linear Regression
- PyTorch - Convolutional Neural Network
- PyTorch - Recurrent Neural Network
- PyTorch - Datasets
- PyTorch - Introduction to Convents
- Training a Convent from Scratch
- PyTorch - Feature Extraction in Convents
- PyTorch - Visualization of Convents
- Sequence Processing with Convents
- PyTorch - Word Embedding
- PyTorch - Recursive Neural Networks
- PyTorch Useful Resources
- PyTorch - Quick Guide
- PyTorch - Useful Resources
- PyTorch - Discussion
- Selected Reading
- UPSC IAS Exams Notes
- Developer's Best Practices
- Questions and Answers
- Effective Resume Writing
- HR Interview Questions
- Computer Glossary
- Who is Who
PyTorch - Sequence Processing with Convents
In this chapter, we propose an alternative approach which instead relies on a single 2D convolutional neural network across both sequences. Each layer of our network re-codes source tokens on the basis of the output sequence produced so far. Attention-like properties are therefore pervasive throughout the network.
Here, we will focus on creating the sequential network with specific pooling from the values included in dataset. This process is also best applied in “Image Recognition Module”.

Following steps are used to create a sequence processing model with convents using PyTorch −
Step 1
Import the necessary modules for performance of sequence processing using convents.
import keras
from keras.datasets import mnist
from keras.models import Sequential
from keras.layers import Dense, Dropout, Flatten
from keras.layers import Conv2D, MaxPooling2D
import numpy as np
Step 2
Perform the necessary operations to create a pattern in respective sequence using the below code −
batch_size = 128
num_classes = 10
epochs = 12
# input image dimensions
img_rows, img_cols = 28, 28
# the data, split between train and test sets
(x_train, y_train), (x_test, y_test) = mnist.load_data()
x_train = x_train.reshape(60000,28,28,1)
x_test = x_test.reshape(10000,28,28,1)
print('x_train shape:', x_train.shape)
print(x_train.shape[0], 'train samples')
print(x_test.shape[0], 'test samples')
y_train = keras.utils.to_categorical(y_train, num_classes)
y_test = keras.utils.to_categorical(y_test, num_classes)
Step 3
Compile the model and fit the pattern in the mentioned conventional neural network model as shown below −
model.compile(loss =
keras.losses.categorical_crossentropy,
optimizer = keras.optimizers.Adadelta(), metrics =
['accuracy'])
model.fit(x_train, y_train,
batch_size = batch_size, epochs = epochs,
verbose = 1, validation_data = (x_test, y_test))
score = model.evaluate(x_test, y_test, verbose = 0)
print('Test loss:', score[0])
print('Test accuracy:', score[1])
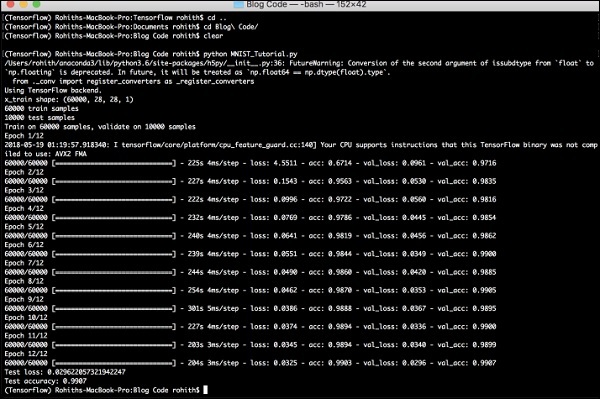
The output generated is as follows −
