- MS Word Basics
- Word - Home
- Word - Getting Started
- Word - Explore Window
- Word - Backstage View
- Word - Entering Text
- Word - Move Around
- Word - Save Document
- Word - Opening a Document
- Word - Closing Document
- Word - Context Help
- Editing Documents
- Word - Insert Text
- Word - Select Text
- Word - Delete Text
- Word - Move Text
- Word - Copy & Paste
- Word - Find & Replace
- Word - Spell Check
- Word - Zoom In-Out
- Word - Special Symbols
- Word - Undo Changes
- Formatting Text
- Word - Setting Text Fonts
- Word - Text Decoration
- Word - Change Text Case
- Word - Change Text Color
- Word - Text Alignments
- Word - Indent Paragraphs
- Word - Create Bullets
- Word - Set Line Spacing
- Word - Borders and Shades
- Word - Set Tabs
- Word - Apply Formatting
- Formatting Pages
- Word - Adjust Page Margins
- Word - Header and Footer
- Word - Add Page Numbers
- Word - Insert Page Breaks
- Word - Insert Blank Page
- Word - Cover Pages
- Word - Page Orientation
- Working with Tables
- Word - Create a Table
- Word - Rows & Columns
- Word - Move a Table
- Word - Resize a Table
- Word - Merging Cells
- Word - Split a Table
- Word - Split Cells
- Word - Add Formula
- Word - Borders & Shades
- Advanced Operations
- Word - Quick Styles
- Word - Use Templates
- Word - Use Graphics
- Word - Auto Correction
- Word - Auto Formatting
- Word - Table of Contents
- Word - Preview Documents
- Word - Printing Documents
- Word - Email Documents
- Word - Translate Document
- Word - Compare Document
- Word - Document Security
- Word - Set Watermark
- Word Useful Resources
- Word - Quick Guide
- Word - Useful Resources
- Word - Discussion
- Selected Reading
- UPSC IAS Exams Notes
- Developer's Best Practices
- Questions and Answers
- Effective Resume Writing
- HR Interview Questions
- Computer Glossary
- Who is Who
Adjust Page Margins in Word 2010
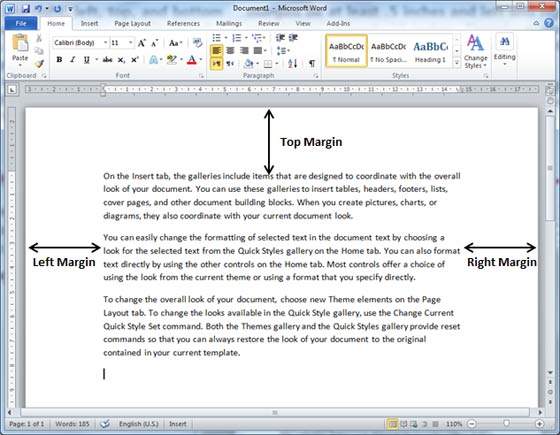
In this chapter, we will discuss how to adjust page margins in Word 2010. Margins are the space between the edge of the paper and the text. You can adjust the right, left, top, and bottom margins of your document. By default, Word sets all margins left, right, top, and bottom to 1 inch.
In the screenshot given below, I have shown top, left and right margins, if you will type the complete page, word will leave 1-inch bottom margin as well.

Adjust Margins
The following steps will help you understand how to set margins for an open document.
Step 1 − Open the document the margins of which need to be set. If you want the margins to be applied only to a selected part of a document, select that particular part.
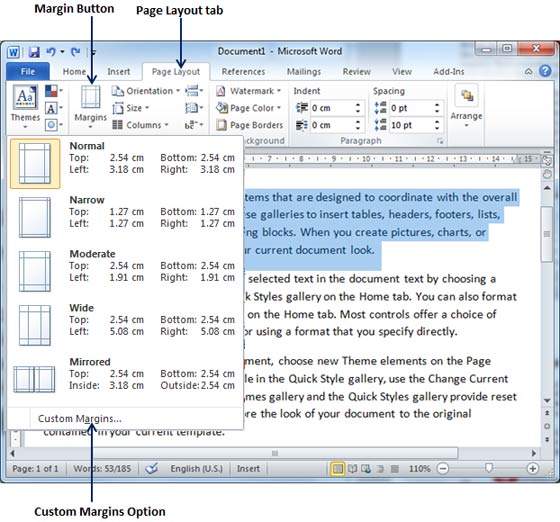
Step 2 − Click the Page Layout tab, and click the Margins button in the Page Setup group. This will display a list of options to be selected but you have to click the Custom Margins option available at the bottom.
You can also select any of the predefined margins from the list, but using custom margins option you will have more control on all the settings.

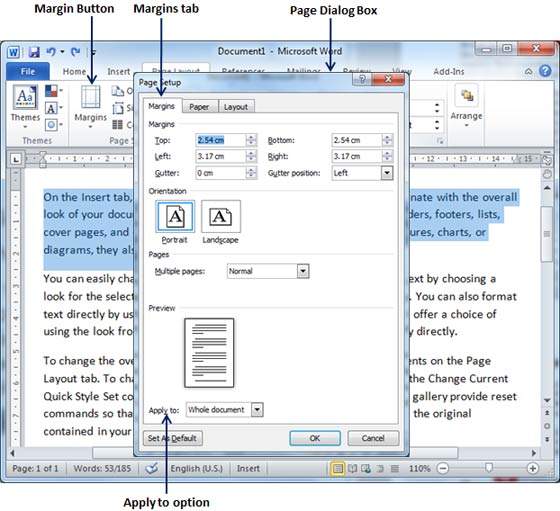
Step 3 − You will have to display a Page Dialog Box as shown below where you can set top, left, right and bottom margins under the Margins Tab. Select the Apply to: option to apply the margin on selected text or complete document.

Step 4 − If you are going to bind the document and want to add an extra amount of space on one edge for the binding, enter that amount in the Gutter text box, and select the side the gutter is on with the Gutter Position drop-down list. After setting all the desired values for all the margins, click the OK button to apply the margins.
