- MS Word Basics
- Word - Home
- Word - Getting Started
- Word - Explore Window
- Word - Backstage View
- Word - Entering Text
- Word - Move Around
- Word - Save Document
- Word - Opening a Document
- Word - Closing Document
- Word - Context Help
- Editing Documents
- Word - Insert Text
- Word - Select Text
- Word - Delete Text
- Word - Move Text
- Word - Copy & Paste
- Word - Find & Replace
- Word - Spell Check
- Word - Zoom In-Out
- Word - Special Symbols
- Word - Undo Changes
- Formatting Text
- Word - Setting Text Fonts
- Word - Text Decoration
- Word - Change Text Case
- Word - Change Text Color
- Word - Text Alignments
- Word - Indent Paragraphs
- Word - Create Bullets
- Word - Set Line Spacing
- Word - Borders and Shades
- Word - Set Tabs
- Word - Apply Formatting
- Formatting Pages
- Word - Adjust Page Margins
- Word - Header and Footer
- Word - Add Page Numbers
- Word - Insert Page Breaks
- Word - Insert Blank Page
- Word - Cover Pages
- Word - Page Orientation
- Working with Tables
- Word - Create a Table
- Word - Rows & Columns
- Word - Move a Table
- Word - Resize a Table
- Word - Merging Cells
- Word - Split a Table
- Word - Split Cells
- Word - Add Formula
- Word - Borders & Shades
- Advanced Operations
- Word - Quick Styles
- Word - Use Templates
- Word - Use Graphics
- Word - Auto Correction
- Word - Auto Formatting
- Word - Table of Contents
- Word - Preview Documents
- Word - Printing Documents
- Word - Email Documents
- Word - Translate Document
- Word - Compare Document
- Word - Document Security
- Word - Set Watermark
- Word Useful Resources
- Word - Quick Guide
- Word - Useful Resources
- Word - Discussion
- Selected Reading
- UPSC IAS Exams Notes
- Developer's Best Practices
- Questions and Answers
- Effective Resume Writing
- HR Interview Questions
- Computer Glossary
- Who is Who
Save Document in Word 2010
In this chapter, we will discuss how to save a document in Word 2010.
Saving New Document
Once you are done with typing in your new Word document, it is time to save your document to avoid losing work you have done on a Word document. Following are the steps to save an edited Word document −
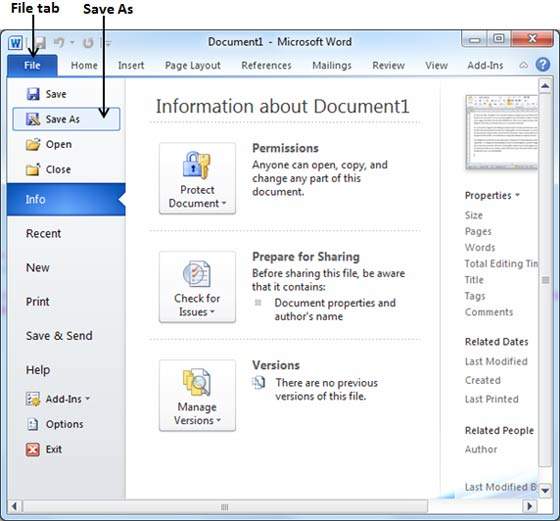
Step 1 − Click the File tab and select the Save As option.

Step 2 − Select a folder where you will like to save the document, Enter the file name which you want to give to your document and Select the Save As option, by default it is the .docx format.

Step 3 − Finally, click on the Save button and your document will be saved with the entered name in the selected folder.
Saving New Changes
There may be an instance when you open an existing document and edit it partially or completely, or an instance where you may like to save the changes in between editing of the document. If you want to save this document with the same name, then you can use either of the following simple options −
Just press the Ctrl + S keys to save the changes.
Optionally you can click on the floppy icon available at the top left corner and just above the File tab. This option will also help you save the changes.
You can also use the third method to save the changes, which is the Save option available just above the Save As option as shown in the above screenshot.
If your document is new and it was never saved so far, then with either of the three options, Word will display a dialogue box to let you select a folder, and enter the document name as explained in case of saving new document.
